Top 6 Mistakes to Avoid When Using Wood Screws
Wood screws can be used for everything, from assembling wooden furniture to securing wall panels and decking. They’re versatile, efficient, and durable.
But using wood screws with little care and improper use can lead to disasters happening, ruining all of your hard work.
To help you avoid this outcome, we’ve created a short guide of the top 6 mistakes to avoid when using wood screws. With ASP, your future projects will live up to the test of time.
1. Selecting the Incorrect Screw Type
The first and foremost common mistake is selecting the wrong screw type (don’t worry, it happens to the best of us).
Depending on the type of wood you’re using and the environment you’re working in, different screws are needed. For softwood, such as pine, screws with a coarser thread are essential to grip the less dense material effectively. For hardwood, like oak or mahogany, screws with finer threads help to prevent splitting.
If you’re completing structural woodwork, opt for durable wood screws instead of drywall screws, as these are prone to snapping under heavy loads. For outdoor applications, invest in screws with a weather-resistant coating, such as galvanised or stainless steel screws. This will prevent rust and corrosion.
2. Using Screws of Inappropriate Length
When it comes to choosing the right wood screw for your project, length matters.
Selecting the wrong length can lead to poor joint integrity, an untidy appearance, and potential safety hazards, especially in load-bearing applications.
Screws that are too short will fail to penetrate the wood deep enough to secure a tight hold. This will lead to screws becoming loose after a short period. Short screws are also more likely to come out under stress or movement when subjected to shifting loads.
The problem with long screws, when they aren’t needed, is the exposed tip. This leads to safety hazards and ruins the visual harmony of a surface, making it look unappealing. Long screws can also cause excessive splitting, damaging the wood, and they can cause screw heads to become stripped.
To avoid this, choose a screw that will penetrate the material by about two-thirds of its length.
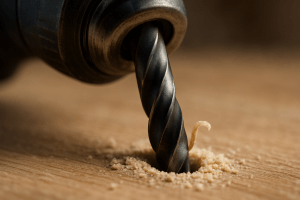
3. Neglecting to Pre-Drill Pilot Holes
Pilot holes are key to achieving a clean finish when installing wood screws. This helps to prevent wood splitting, especially when placing screws near edges or ends, and results in a cleaner finish.
If you forget to drill pilot holes, you will damage the wood and weaken the joint, affecting the durability of your installation.
To do this, measure the distance needed for the screws with a tape measure and use a drill to create a pilot hole with a depth slightly shorter than the screw’s full length.
For softwoods, use a drill bit that is about 70% of the screw diameter and 80% of the screw diameter for hardwoods. This will prevent the screw from protruding out of the other side.
4. Over-Tightening Screws
While screws require a good amount of tightening to ensure a secure fit, over-tightening can lead to the screw becoming damaged.
This includes stripping the screw head, making it difficult to tighten or remove without special tools, ultimately causing you to spend more time and money fixing it. Over-tightening can also cause damage to the screw thread, resulting in a loose fit.
Not only does this affect the screw itself, but it can distort the wood surface, especially when working with softwood, MDF, or plywood. To avoid this, use a screwdriver or a drill with torque control to insert the screw until it’s flush with the surface.
5. Misaligning Screws During Installation
Proper screw alignment is essential to creating a secure hold in your material, as this distributes pressure evenly, leading to a professional-looking installation.
Misaligning screws has the opposite effect, creating an uneven surface and weak joints. This can warp the material and make the surface appear messy, especially in wooden furniture that is visible to guests.
Screws that are driven in at an angle won’t engage with the second material fully, leading to a faulty installation. To avoid this, be sure to take your time, making accurate measurements for spacing and applying even pressure when drilling.
6. Ignoring Wood Grain Direction
The direction of the wood grain plays a large role when making sure wood screws are installed correctly and appear neat.
Ignoring the grain can lead to split and weakened joints, with many people placing screws too close to the edge of the wood. Failing to countersink the screw properly can also lead to the top fibres of the wood becoming crushed.
Instead, insert your screws at least two diameters away from the edge and examine the length of the board to determine the direction of the grain. Drive your screws in line with the grain for maximum strength.
Pre-drilling pilot holes and using screws with coarse threads will also enhance grip and prevent splitting.
Choose ASP For Your Wood Screws
At ASP, we understand what it takes to achieve a clean, professional, and long-lasting finish when working with wood.
Whether you’re working on a large-scale construction project or a DIY project, our wood screws are designed to meet your every need. Our selection includes screws designed for both indoor and outdoor use and a variety of lengths and finishes.
Browse our collection today and secure the right fastening solutions for your project with our range of screws and fixings.