
Are you working on installing some new cabinets or adding some furniture to your home? When it comes to decor, you really want to aim for that clean, unobtrusive look.
For this reason, many people aim for a countersunk screw look. These are designed to sit flush with the surface of the wood so that the head isn’t poking out. Not only does it make the finish look more seamless and professional, but it also stops the screw from snagging on clothes or other furniture.
Plus, it’s less likely to be ripped out if the screw is inserted deeply into the material. It’s not just great for furniture, but also for electronics and machinery. Today, ASP will run you through everything you need to know about countersinking a screw at home.
It’s the perfect way to take your DIY projects to the next level, and it’s easier than you think!
Browse our range of bulk screws today to stock up for your next project.
What is Countersinking?
Woodworkers and metalworkers often use this technique to achieve a smooth, neat finish.
To do this, use a countersink bit to create a bevelled edge on the surface. This way, you’ll avoid the rough, chewed-up look around the screw and end up with a clean finish with no protruding head.
It’s the best way to create a polished, professional look from home, making all of your furniture look that much more appealing. Not only does this look better, but it also increases the durability of the screw and reduces damage to the material.
Plus, flush fixings are less likely to catch on clothing, skin, or tools, reducing the risk of injury when walking around the house or ruining your favourite jumper.
What are the benefits of countersinking a screw?
Countersinking sounds like an extra step, but it actually makes your job easier and produces a much better finished result.
What’s the hassle of the added step compared to enjoying a durable screw that won’t cause you more issues during installation? We’ve already briefly mentioned a few of the benefits of countersinking a screw, so let’s just summarise:
- They make furniture look neater and appealing
- It prevents snagging and injury, especially on floors, steps, and handrails you touch or walk on every day.
- Countersinking spreads the load across the surface, making the screw last longer and creating a tighter, more secure fit.
- It makes the surface easier to paint, sand, or fill, since the screw isn’t hanging out and disrupting the finished look.
- The screw heads all line up neatly when using a countersink bit, since every recess ends up the same depth and angle.
When should you countersink a screw?
So, when does countersinking a screw really matter? It doesn’t need to be done every time, especially if the fixing isn’t visible. Most people use this technique for:
- Assembling furniture (shelves, tables, chairs, etc.)
- Walkways, like stairs, floors, and decking.
- Screwing into Hardwoods, MDF and brittle materials.
If you’re using pan-head, round-head, or hex-head screws (designed to sit on the surface), countersinking isn’t really necessary.
The Tools Required
To countersink a screw, you’ll need the following tools:
- Countersink bit
- Drill
- Screws
- Centre punch
- Straight edge
- Clamps
- Depth gauge
- Measuring tape and pencil
PPE: When working with sharp tools and machinery, wear safety gloves and goggles to prevent injury to the eyes and hands.
A Step-by-Step Guide to Countersinking a Screw
Once you have gathered the necessary tools, it’s time to get stuck into the process:
1. Select the Right Bit
Choose a countersink bit with a diameter that matches your screw. For most woodworking materials, a standard countersink screw is ideal.
The countersink bit should be slightly larger than the screw head so it sits flush beneath the surface.
2. Mark the Spot
Use a pencil to mark the spot where your screw needs to be inserted so you can use it as a guideline. You could even lightly press a nail or bradawl into the mark to give the drill bit a small dimple to sit in, stopping it from wandering.
Then use the centre punch to make a small indentation at this mark to prevent the drill bit from wandering. For multiple screws, use a straight edge for consistent alignment and spacing.
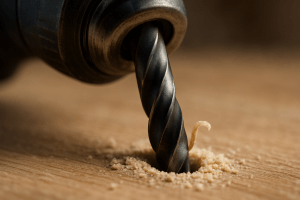
3. Drill the Pilot Hole
Drill a pilot hole into the material that is marginally smaller than the diameter of your screw to lessen the chance of splitting or cracking.
If you need to, clamp the surface in place so you’ve got a more sturdy workpiece to drill into.
Hold the drill perpendicular to the material and drill the pilot hole to the same depth as the threaded portion of the screw. Use a depth gauge to make sure that the depth remains consistent each time if you need to insert multiple screws.
4. Countersink the Hole
Attach the countersink bit to your drill and align it with the pilot hole. Drill slowly and apply steady pressure for a neat finish so you don’t crack or split the surrounding material.
Stop drilling after the countersink has reached the desired depth and the hole is deep enough to allow the screw head to sit flush or slightly below the surface.
Test the fit by inserting the screw into the countersunk hole (before drilling it into the surface).
5. Drive the Screw
Once the hole has been countersunk, choose a screw that matches the material. Flathead screws are perfect for a flush finish.
Then, drive the screw into the pilot hole using a screwdriver or drill with a screwdriver bit. To avoid stripping the screw or harming the material, apply steady pressure and proceed at a slow to medium pace.
Once it’s in, don’t tighten it too much; otherwise, the material could split.

6. Sand and Finish
Once the screw is in place, smooth the area around the head with fine-grit sandpaper.
If you want to make the screw seem invisible, fill the small hole above the screw with filler, let it dry, then sand it smooth. You can then apply paint, stain, or a protective coating for a long-lasting finish.
Are you feeling stuck? Follow this easy YouTube tutorial for a visual step-by-step guide.
Choose ASP for All of Your Screw Needs
At ASP, we provide a wide selection of screws for every application.
From wood screws to hammer fixings and more, we offer long-lasting, durable screws suitable for both professional and DIY applications. Plus, you’ll find a range of specialised coatings and finishes for a long-lasting hold.
Browse our screws today to ensure a durable and smooth finish every time.
FAQ’s
Can I countersink screws in any material?
Yes, you can countersink screws in various materials, including metal, wood (such as softwood, hardwood, MDF, and plywood), and plastic.
However, different materials may require specific techniques or bits, and you’ll need to use the correct type of screw for the job. For wood, a standard countersink bit and general-purpose countersunk wood screw are usually ideal, while you’ll likely need a high-quality HSS or similar countersink bit for metal surfaces.
It’s best to drill at a steady speed when working with metal to prevent overheating. When it comes to plastics and softer materials (like uPVC or composite), drill more slowly and avoid too much pressure so you don’t melt or crack the surface.
What are common mistakes to avoid when countersinking?
If it’s your first time countersinking a screw, you’re bound to make some mistakes. However, we’ve listed a few easy ones to make to help you avoid having to rip it out and do it again:
- Using the wrong size counterbit: If it’s too small, the screw head won’t sit flush. If it’s too big, it may drop too far below the surface or weaken the surface.
- Drilling too deep or too shallow: Going too deep can again weaken the material, while drilling too shallow will cause the nail to protrude out (defeating the purpose of countersinking).
- Skipping or mis-sizing the pilot hole: Doing so can cause splitting (especially in hardwoods) or excessive resistance. This can also split the screw itself.
- Drilling too fast: Going too fast when drilling can overheat and burn the wood, metal, or plastic surface, reducing the longevity of the hold.
- Overtightening the screw: Driving the screw too hard can strip the threads, deform the head, or crush the surrounding material, creating an untidy finish.
- Not securing the workpiece: If you don’t secure the material properly beforehand, the drill bit can wander, chatter, or grab, leaving an uneven countersink and a loose screw.
Practise on scrap material to master your technique beforehand, and follow the precise measurements to avoid damaging the material.
Can I use a regular drill bit to countersink a screw?
A regular drill bit can create a pilot hole; however, you need a countersink bit to create the conical recess for the screw head.
Countersink bits are designed to create a neat, cone-shaped hole that matches the shape of the screw head for a tight, secure grip. You end up with a flush, seamless finish for a professional-looking result from home.
Combination pilot-and-countersink bits are also available so that you can drill the pilot and countersink in one go.
Can I countersink screws in metal, and how is it different from wood?
Yes, you can countersink in metal, but the method differs slightly from that for timber. Instead, you’ll need to:
- Use a proper HSS or carbide countersink bit designed for metal
- Run the drill at a slower speed than you would in wood
- Apply light pressure and avoid forcing the bit
- Use a drop of cutting oil on tougher metals to prevent the bit from overheating